A storm just tore through your neighborhood. Maybe it was golf ball hail in Seymour. Maybe straight-line winds swept through Springfield at 70 mph. You know your roof took a hit. Now comes the part that stresses most homeowners out: dealing with your insurance company. This guide walks you through every step in plain language, tells you what to say, what to avoid, and exactly how Roov helps you from the first call to final approval.
TLDR: Call a roofer before you call your insurance company. A professional inspection creates the documented evidence your claim needs to succeed. Then file, prepare for the adjuster visit with your roofer present, and review every line of the estimate before agreeing to anything. The process is manageable when you know the steps. Keep reading for the full breakdown.
Most homeowners have never filed a roof damage insurance claim before. The terminology is unfamiliar, the process feels opaque, and there is a real fear of getting lowballed or denied outright. That stress is completely normal.
But here is the thing: insurance claims follow a predictable process. When you understand that process and take the right steps in the right order, you protect your home, your wallet, and your right to a fair payout.
Here is exactly how it works.
Step 1: Call a Roofer Before You Call Insurance
This is the most important step, and it is the one most people skip.
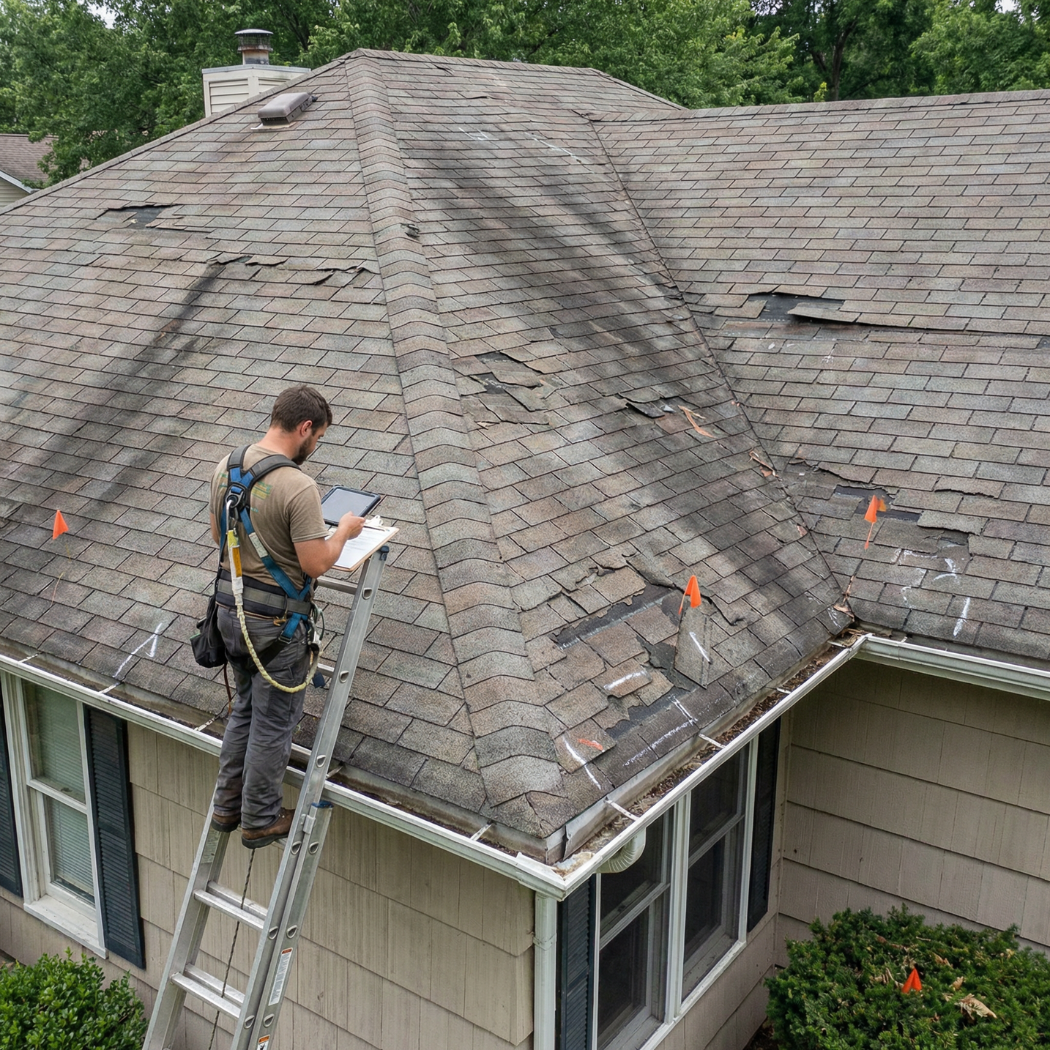
Before you dial your insurance company, call a local roofing contractor for an inspection. The reason is straightforward: a trained roofer documents the real damage first. That documentation becomes your evidence when you file the claim.
If you call insurance first without any documentation, the adjuster shows up with no baseline. They may miss hail bruising, undervalue wind damage, or classify legitimate storm damage as normal wear. You have handed them the opportunity to frame the story before you have any evidence of your own.
A professional inspection flips that dynamic. You walk into the claims process with photos, a written Roof Condition Report, and a clear record of exactly what the storm did.
Roov’s storm damage roof inspections are completely free. We document every slope, every flashing point, every vent and gutter. Then we give you a detailed written report with photos.
Pro tip: Even if you are not sure whether damage is significant enough to file a claim, get the inspection done first. Roov will tell you honestly whether filing makes sense for your specific situation.
Step 2: Document Everything Before Anyone Touches the Roof
Before any repair work begins, document every visible sign of damage with your phone.
From the ground, photograph missing or lifted shingles, dents in gutters and vent caps, debris in the yard, and any water stains or ceiling spots inside your home. Write down the date of the storm and a brief description of what you experienced. Pull the National Weather Service storm report for your area if hail was involved. That published record ties your damage to a specific weather event, which protects your claim.
One important rule: do not make permanent repairs before the adjuster visits. Temporary fixes like tarping an active leak are fine and often reimbursable. But permanent repairs before the adjuster arrives can complicate coverage determination. Keep every receipt for anything you spend on emergency mitigation.
| Documentation Step | Why It Matters |
|---|---|
| Photos from the ground | Establishes visible damage before any work begins |
| Storm date in writing | Creates a timeline connecting damage to event |
| NWS storm report | Confirms hail size and path in your area |
| Interior damage photos | Supports claims for ceiling, insulation, or attic damage |
| Temporary repair receipts | Often reimbursable under your policy |
Pro tip: Weather.gov publishes storm event records searchable by date and county. Bookmark the National Weather Service report for your area immediately after a significant storm. That document is free evidence in your favor.
Step 3: File Your Claim — What to Say and What Not to Say
Call your insurance company or your local agent. Have your policy number ready. When you call, give them three things: the date of the storm, a brief description of the damage, and your contact information. That is enough for the first call.
Do not give a detailed repair estimate over the phone. Do not agree to any settlement language on the initial call. Do not describe damage in ways that might minimize the scope. Your goal on this call is to open the claim, receive your claim number, and establish the adjuster timeline.
If you have trouble reaching your insurer or feel like you are getting the runaround, the Missouri Department of Insurance severe weather claims resource includes a consumer hotline at 800-726-7390. Missouri law gives you specific rights as a policyholder, and that office exists to help you use them.
Pro tip: After you file, send a follow-up email to your agent confirming the claim number, the date filed, and the adjuster’s expected timeline. A paper trail protects you if anything gets disputed later.
Step 4: The Adjuster Visit — Why Your Roofer Should Be There
Your insurance company will send an adjuster to inspect the damage and write an estimate. Here is the single most important thing to understand about that visit: the adjuster works for the insurance company, not for you.
That does not mean adjusters act in bad faith. But their estimate reflects their training and the interests of their employer. Having your roofer present on the roof during that visit is the most effective thing you can do to protect a full and fair outcome.
Roov meets adjusters on the roof for every customer who needs it. We walk the slopes with them, point out hail bruising and seal failures that are easy to overlook without hands-on training, and make sure the written estimate reflects the full scope of damage.
GAF’s guidance on working with your contractor and insurer after wind damage specifically recommends having a licensed, experienced contractor involved in the adjuster assessment. The reason is simple: damage that does not get documented at this stage does not get paid.
| What Adjusters Often Miss | Why It Gets Overlooked |
|---|---|
| Hail bruising on shingle mat | Requires hands-on pressure test, not visual scan |
| Broken seal strips | Shingles lay flat; damage is not visible from standing |
| Hairline flashing cracks | Require close inspection at chimney and vent junctions |
| Pipe boot and vent cap damage | Often minor visually but actively allowing water entry |
| Attic moisture or insulation damage | Requires interior access most adjusters skip |
Pro tip: Call Roov as soon as you receive your adjuster appointment date. We coordinate our schedule around yours and arrive before or at the same time as the adjuster.
Step 5: Review the Estimate and Know Your Rights
When the insurance estimate arrives, read every line before signing or accepting anything.
Two policy types determine how your payout works:
| Policy Type | How It Pays | What to Watch For |
|---|---|---|
| RCV (Replacement Cost Value) | Full replacement cost minus your deductible | Depreciation is held back initially, released after work is complete |
| ACV (Actual Cash Value) | Replacement cost minus depreciation | You receive less upfront; older roofs receive less coverage |
If your policy is RCV, you typically receive the ACV portion first. The depreciation holdback is released after the completed work is documented. Do not assume the first check is the final settlement on an RCV policy.
You have the right to choose your own contractor. Your insurance company cannot require you to use a specific roofing company. If you disagree with the adjuster’s estimate, you can request a re-inspection. If that does not resolve it, you can file a formal complaint with the Missouri Department of Insurance.
Roov’s roof insurance claim assistance team reviews estimates with customers line by line and identifies common underpayment issues before you sign.
Pro tip: If the estimate references “matching” for shingles, pay attention. Missouri code in many jurisdictions requires that replacement materials match the existing roof in appearance. If matching shingles are discontinued, that can trigger a full replacement approval.
Common Reasons Claims Get Denied
Understanding why claims get denied is the first step toward avoiding it.
| Denial Reason | How to Prevent It |
|---|---|
| Filed too late | Report damage within 60 days; file within 12 months |
| Wear and tear classification | Professional inspection report clearly attributes damage to storm event |
| Cosmetic damage exclusion | Review your policy for cosmetic exclusion language before storm season |
| Insufficient documentation | Photos, NWS report, and written Roof Condition Report before filing |
| Pre-existing damage | Document your roof’s condition regularly, even before storms |
Real example: A homeowner in Ava had a hail damage claim partially denied on the grounds that some shingle wear was pre-existing. Roov’s written inspection report, which included specific hail hit documentation with measurements, supported a successful supplement claim that recovered the denied portion.
If a claim has been denied, a detailed contractor inspection report is often the most effective tool for dispute. The Missouri Department of Insurance also accepts formal complaints and has authority to investigate unfair claims practices.
Pro tip: Do not accept “wear and tear” as a final answer without a second opinion from your contractor. Hail damage and wear often coexist on older roofs, and both may be legitimately covered depending on your policy.
Storm Chasers vs. Local Roofers
After every significant storm, out-of-town crews flood Southwest Missouri going door to door. Some are legitimate. Many are not. Knowing the difference protects you financially and legally.
| Storm Chaser Red Flags | Local Roofer Green Flags |
|---|---|
| Unsolicited door knock, day after storm | You called them; they do not chase leads |
| Out-of-state license plates | Local address, local office, local references |
| Pressure to sign a contract immediately | Written inspection report before any contract |
| Offer to waive or cover your deductible | Clear, legal discussion of deductible responsibility |
| Cannot provide local references | Years of verifiable local reviews |
| No physical business address in Missouri | Based in Nixa, serving Southwest Missouri |
Waiving your deductible is not a favor. In Missouri, it is insurance fraud. Any contractor who offers it is exposing you to legal liability alongside themselves.
Roov is based in Branson, Springfield, and Nixa. We are GAF Master Elite certified, Google Guaranteed, and 5-star rated. We were here before this storm, and we will be here long after the storm chasers have moved to the next disaster market.
Pro tip: Before signing anything with any roofing contractor after a storm, verify their Missouri contractor license, check Google reviews older than 6 months, and confirm they have a physical local address. Five minutes of research can save you thousands.
What to Do Right After a Storm
- Document visible damage from the ground with photos and video.
- Write down the storm date and pull the NWS report for your county.
- Call Roov for a free professional inspection before contacting your insurer.
- Apply temporary tarps to any active leaks and save all receipts.
- File your claim with your policy number and storm date. Keep the call brief.
- Schedule the adjuster visit and notify Roov so we can be present.
- Review the estimate carefully before accepting or signing anything.
Frequently Asked Questions
Q: Should I call my insurance company or a roofer first? Call a roofer first. A professional inspection creates documented evidence before the adjuster forms their own assessment. Filing a claim without documentation puts you at a significant disadvantage from the start.
Q: How long do I have to file a roof damage claim in Missouri? Most Missouri policies require you to report damage within 60 days and file a formal claim within 12 months of the storm event. Waiting weakens your claim because it becomes harder to tie damage to a specific event. Act quickly and document everything.
Q: What is the difference between RCV and ACV coverage? Replacement Cost Value (RCV) covers the full cost to replace your roof with new materials, minus your deductible. Actual Cash Value (ACV) subtracts depreciation based on your roof’s age, so older roofs receive less. Check your policy declarations page to confirm which type you have.
Q: Can my insurance company tell me which contractor to use? No. You have the right to choose your own licensed contractor. Your insurer can suggest names but cannot require you to use their preferred company.
Q: What if the adjuster misses damage? Request a re-inspection in writing. Having a detailed contractor report that identifies specific missed items strengthens your re-inspection request significantly. If the re-inspection does not resolve it, file a complaint with the Missouri Department of Insurance at 800-726-7390.
Q: Can I make repairs before the adjuster comes? Temporary repairs like tarps are fine and often reimbursable. Do not make permanent repairs before the adjuster visit. Permanent repairs can prevent the adjuster from assessing the original damage, which may reduce or complicate your payout.
Q: What is a depreciation holdback? On an RCV policy, your insurer typically releases payment in two parts. The first check reflects the ACV. After the work is completed and documented, they release the withheld depreciation amount. Make sure your contractor understands this process and submits the completion documentation your carrier requires.
Q: A contractor offered to waive my deductible. Is that okay? No. Waiving or paying a customer’s deductible is insurance fraud in Missouri. It exposes both you and the contractor to legal consequences. Walk away from any contractor who makes this offer.
Key Takeaways
- Call a roofer first. A professional inspection before you file creates the documentation that protects your claim from the start.
- Document everything immediately. Photos, storm reports, and interior damage records are your evidence. Gather them before anything is repaired.
- Keep the first insurance call simple. Open the claim, get your claim number, and confirm the adjuster timeline. Nothing more.
- Have your roofer at the adjuster visit. Damage that is not documented at that visit is damage that does not get paid.
- Know your policy type. RCV and ACV policies pay very differently. Understanding yours before you file prevents surprises.
- Denials can be disputed. A professional inspection report and the Missouri Department of Insurance complaint process are both tools available to you.
- Storm chasers are a real risk. Verify local presence, licenses, and reviews before signing anything after a storm.
Let Roov Handle the Hard Parts
The insurance process does not have to be overwhelming. Roov handles it with you from the first inspection to the final check.
We inspect your roof for free, produce a detailed written report, meet your adjuster on the roof, review the estimate with you line by line, and stay engaged through the entire claim. Hundreds of Southwest Missouri homeowners have gotten a new roof for just their deductible because we handled the process correctly.
Serving Lebanon, Seymour, Springfield, Branson, Ava, and all of Southwest Missouri.
Call: 417-370-1259 Email: [email protected] Visit: roovmo.com
Roov | Roofing with a Purpose | Serving Southwest Missouri