
Most homeowners blame their shingles when the roof leaks. But in Southwest Missouri, the real culprit is usually flashing: the thin metal sealed around chimneys, pipes, valleys, and skylights. This guide explains what roof flashing is, where it lives on your roof, why Missouri’s weather destroys it fast, and what a small flashing leak ignored will cost you down the road.
TLDR: Roof flashing seals the gaps where your roof meets other surfaces. It fails from freeze-thaw cycles, hail, UV damage, and age. Early signs include ceiling stains near chimneys or exterior walls, rust streaks, and cracked sealant. A roof flashing repair in Marshfield MO typically runs $350 to $500. Ignoring it can turn into $3,000 to $5,000 in structural damage. Schedule a free inspection and catch it early.
You notice a water stain near the fireplace. Or a damp patch on the wall where it meets the roofline. You check the shingles from the ground and everything looks intact. So what’s going on?
You’re almost certainly looking at a flashing failure. Homeowners across Marshfield, Ozark, and Lebanon deal with this kind of mystery leak every year. The shingles are fine, but water found a way in through a gap in the metal sealing the most vulnerable parts of the roof. Once you understand what roof flashing is and where it lives, you’ll know exactly where to look.
What Is Roof Flashing and Where Is It On Your Roof?
Roof flashing is thin metal, typically galvanized steel, aluminum, or copper, installed wherever your roof surface meets a vertical structure or changes direction. Shingles alone can’t seal those transition points. Flashing bridges the gap and directs water away from the joint rather than into it.
There are five main locations where you’ll find flashing on a typical home. Every one is a potential leak source when flashing fails.
| Flashing Location | What It Does | What It Looks Like | Common Failure Mode |
|---|---|---|---|
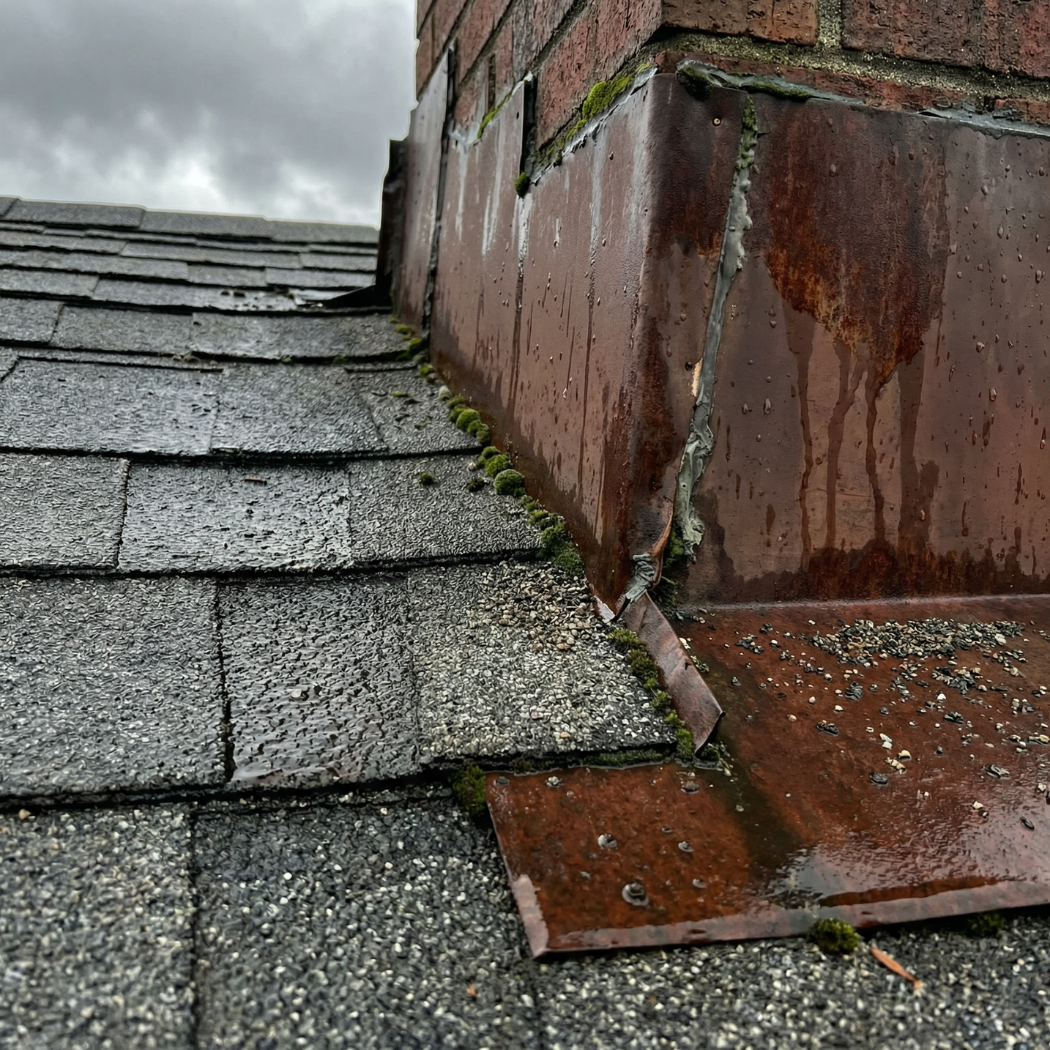
| Chimney | Seals all four sides of the chimney at the roofline | Metal strips at the base and sides, plus a cap piece (counter flashing) tucked into mortar | Mortar cracks, sealant dries out, metal lifts from freeze-thaw movement |
| Pipe boots | Seals the base of any pipe or vent that pokes through the roof | A rubber collar and metal base flange around the pipe | Rubber cracks and shrinks from UV and heat; tears from hail |
| Valleys | Channels water from where two roof slopes meet | Metal strip running down the V-shaped crease between slopes | Debris buildup backs water behind it; metal corrodes over time |
| Skylights | Seals all four edges where the skylight frame meets the roof | Metal frame strips on all sides, often with an upslope saddle piece | Sealant caulk dries and cracks; step flashing separates from thermal movement |
| Walls and dormers | Seals where a vertical wall meets a sloped roof | Step flashing woven between shingle courses plus a wall flashing cap at the top | Step pieces work loose; sealant fails at the top piece with age |
Pro tip: Counter flashing on a chimney is embedded into the mortar joint. If that mortar develops even a hairline crack, water travels behind the metal and runs straight down the inside of the wall, invisible until it appears as a stain inside your home.
Pro tip: Pipe boots are the shortest-lived flashing on most roofs. In Southwest Missouri’s heat and UV exposure, rubber pipe boot collars commonly start cracking between 10 and 15 years, well before the surrounding shingles show their age.
Pro tip: Valley flashing is the easiest to miss because the valley often looks clean from the ground. Walk around the perimeter after heavy rain and check for wet wall areas or damp spots on the ceiling directly below a roof valley.
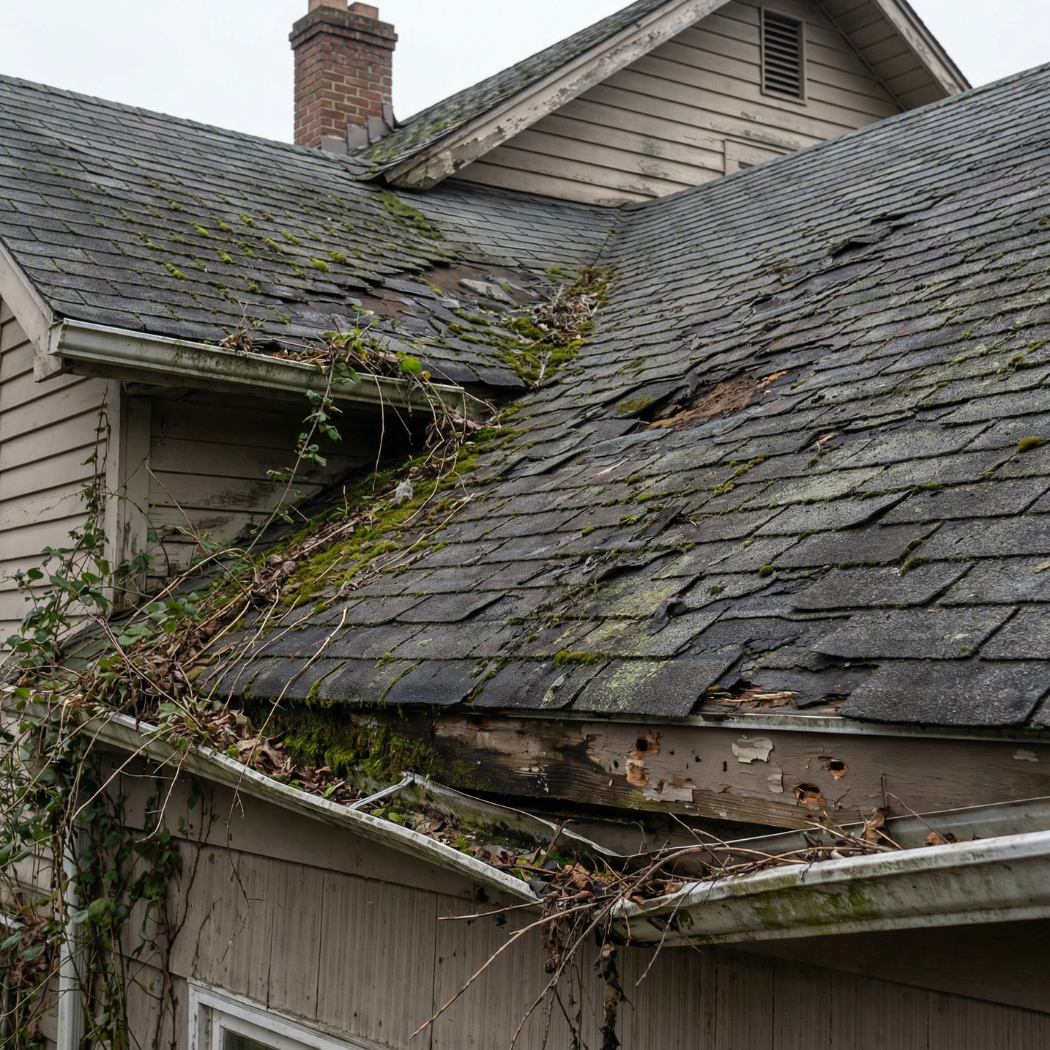
Why Missouri Weather Destroys Flashing Faster
Flashing survives by staying sealed tight against the surfaces it connects. Missouri’s climate attacks that seal from multiple directions at once.
Freeze-thaw cycles are the single biggest long-term threat to roof flashing repair in Missouri. When temperatures swing from freezing to 60 degrees Fahrenheit in just a few days, a pattern routine across Webster County and the surrounding region. Metal expands and contracts with every swing. The sealant holding flashing to masonry or wood flexes with every cycle. Over several seasons, it cracks, pulls away, or hardens past the point where it bonds. The National Weather Service Springfield office tracks the freeze-thaw patterns that drive this kind of damage across Southwest Missouri every year.
Hail is the second major threat. Hail that dents your gutters also strikes rubber pipe boot collars with enough force to crack them. That crack may be a pinhole at first. By the next hard spring rain, it becomes a water channel running into your attic.
UV and summer heat degrade the rubber on pipe boots and the caulk on skylight and wall flashing. After a few Missouri summers, sealant that was once flexible can go brittle in a single hot season.
Heavy, wind-driven spring rain exploits whatever gaps other factors created. A section of step flashing lifted just a quarter inch is invisible in dry weather. A 40-mph driving rain finds it within minutes.
Southwest Missouri’s weather hits flashing differently depending on the season. Knowing the pattern helps you know when to look and what to look for.
| Season | Primary Threat | Which Flashing Is Most at Risk | What to Check |
|---|---|---|---|
| Winter | Freeze-thaw cycles crack sealant and lift metal | Chimney counter flashing, step flashing at walls | Mortar joints at chimney, any separated metal at dormer walls |
| Spring | Wind-driven rain exploits winter-opened gaps | All types, especially pipe boots and valleys | Interior ceilings near all penetration points after the first heavy rain |
| Summer | UV and heat degrade rubber and caulk | Pipe boot collars, skylight sealant, wall caulk | Cracked, shrunken, or chalky sealant around boots and skylights |
| Fall | Temperature swings resume freeze-thaw movement | Chimney, step, and valley edges | All caulked surfaces before the first hard freeze |
The right time for a roof flashing repair in Missouri is October, before winter damage has a chance to occur. Catching lifted sealant or a cracked pipe boot in the fall costs a fraction of what an open gap through a wet Missouri winter will cost by spring.
Pro tip: The first sign of freeze-thaw flashing failure often appears in late winter or early spring, right after temperatures finally rise above freezing for the first time. If you see a new ceiling stain in February or March, suspect flashing before you suspect shingles.
Pro tip: Schedule your annual flashing check in October while temperatures are still workable. Sealant applied in cold weather bonds poorly. A fall inspection and repair done right will hold through the full freeze-thaw season ahead.
Real example: A homeowner in Republic called Roov after noticing a new brown stain near a skylight every spring for two consecutive years. Both times, the stain dried up and was ignored. Roov found the upslope saddle flashing behind the skylight had separated from the curb. Water had been pooling there for two full seasons. The wood at the base of the curb had begun to soften. Early roof flashing repair would have been a one-hour job. By the time Roov arrived, the curb itself needed partial replacement.
Real example: A family in Marshfield noticed a water stain appearing on their living room ceiling every spring after heavy rains but never after ordinary showers. Roov found that a section of step flashing along a dormer wall had lifted about a quarter inch, just enough to let wind-driven rain enter. Dry-weather inspections had missed it for two seasons. A targeted roof flashing repair solved it completely.
How To Spot Signs of Failed Roof Flashing
What to Look for Inside Your Home
Start inside, particularly in the attic. Water from a flashing leak usually travels before it shows up on a ceiling.
Look for water stains on ceiling drywall near a chimney, exterior wall, or skylight. Check for wet or discolored insulation directly below any roof penetration or flashing point. Dark staining or mold on the underside of roof decking near a chimney or pipe is another clear signal. A musty smell in a room adjacent to an exterior wall, even without a visible stain, can indicate a slow roof flashing leak Marshfield homeowners often overlook until it spreads.
This quick reference table shows what signs of failed roof flashing look like from inside compared to outside your home.
| Sign | Where You See It | What It Likely Means | Urgency |
|---|---|---|---|
| Yellow or brown ceiling stain near chimney | Interior ceiling | Chimney counter flashing or step flashing failure | High: call for inspection now |
| Damp or stained attic insulation | Attic, below flashing point | Active water intrusion from a flashing gap | High: damage is already underway |
| Rust streaks on brick below chimney | Exterior brick or siding | Oxidized metal from a long-term flashing failure | High: water has likely been entering for a while |
| Cracked or chalky sealant around a pipe | Exterior pipe collar area | Pipe boot sealant has dried and separated | Moderate: repair before the next rain event |
| Lifted metal edge at valley or wall | Exterior roof surface | Thermal movement opened a gap | Moderate: becomes high with any wind-driven rain |
| Musty smell near exterior wall with no stain | Interior room | Slow, intermittent water infiltration | Moderate: inspect before the stain appears |
Pro tip: Bring a flashlight into your attic after any significant rain event. Wet wood rafters or stained insulation tell you water is getting in even before it shows up on your ceiling below.
Pro tip: If you see any two signs from the table above, inside or outside, treat it as confirmed flashing failure until a professional says otherwise. Two signs rarely coincide by accident.
What to Look for Outside Your Home
From the ground or a safe vantage point at gutters, look for these specific indicators at each flashing location.
Rust streaks running down brick or siding below a chimney are a near-certain sign of chimney flashing failure. Look for visible gaps between the flashing metal and the chimney base, or sealant caulk that looks cracked, chalky, or missing entirely where flashing meets any vertical surface. Pipe boot collars that look shrunken or cracked, rather than sitting flat and tight against the pipe, need attention. Lifted or bent metal at valley edges, or any daylight visible under a corner piece, requires a professional evaluation.
Pro tip: Binoculars let you examine flashing on steep or high sections without getting on the roof. Focus specifically on the mortar line just above chimney counter flashing. A crack there is a near-certain active leak source.
Pro tip: Rust is a later-stage warning sign. If you see rust streaks, the flashing has been damaged long enough for oxidation to develop. That usually means water has been entering for a while already.
Real example: A homeowner in Ozark noticed rust-colored streaks running down the brick below his chimney after a winter storm. He assumed it was a mortar issue. Roov found the counter flashing had separated from the mortar joint on the downslope side, letting water run behind the base. A roof flashing repair in Missouri for this type of chimney issue stopped both the leak and the staining.
DIY Fix or Call Roov? Straight Talk by Flashing Type
Some minor flashing issues allow a careful homeowner to apply a temporary patch. Most do not. Here is an honest breakdown. For anything beyond a temporary sealant touch-up, schedule a professional storm damage and roof repair assessment before the next rain event.
| Flashing Type | DIY Safe? | What You Can Do | When You Must Call a Pro |
|---|---|---|---|
| Pipe boot | Limited | Apply roof sealant caulk around a cracked collar as a temporary patch | Collar is fully cracked, shrunk, or torn: full boot replacement needed |
| Chimney flashing | No | Nothing beyond temporary sealant on a small visible gap | Any cracked mortar, separated counter flashing, or visible rust: always call a professional |
| Valley flashing | No | Clear debris from the valley channel | Any separation, rust, or lifted metal requires professional re-flashing |
| Skylight flashing | No | Inspect and apply temporary sealant to a small visible gap | Any lifted metal, damaged step flashing, or active water intrusion |
| Step and wall flashing | No | Visual inspection only | Any lifted, bent, or missing step flashing: requires reinstallation integrated with shingles |
Pro tip: Roof sealant caulk is a temporary measure only. It buys time until a professional can address the root cause. Never treat a caulk application as a completed repair.
Pro tip: Never attempt chimney flashing work yourself. Chimney counter flashing must be tuck-pointed into the mortar at the correct depth and angle. An improper installation will leak worse than the original failure and may void your warranty.
Real example: A homeowner in Lebanon applied roofing caulk to a pipe boot collar herself after finding it cracked. It held through a few rains. By fall, the collar had shifted further and water was penetrating behind the base flange. The final roof flashing repair cost more than a professional boot replacement would have from the start.
What Happens If You Ignore a Small Flashing Leak
Here is a realistic scenario Roov sees regularly across Webster County.
A Marshfield homeowner notices a dime-sized yellow stain near the fireplace after an April rain. The stain dries out and doesn’t grow. Life gets busy. It stays small all summer.
By October, after a heavy fall rain, the stain is now half the size of a dinner plate. The drywall has softened. By the following spring, the roof decking just above the chimney step flashing has started to rot from a full year of intermittent moisture. The insulation in that attic section is saturated and molded.
What started as a $350 to $500 roof flashing repair in Southwest Missouri is now a bill that includes decking replacement, new insulation, drywall repair, and mold remediation, totaling $3,000 to $5,000 or more.
The flashing failure itself never got worse. The water just had 12 months to do what water does.
A flashing failure doesn’t grow. The damage it causes does.
Pro tip: If a ceiling stain dries out and stops showing, don’t assume the leak fixed itself. Flashing gaps don’t seal on their own. The moisture is still entering. It’s just waiting for the right rain angle or intensity to appear again.
Real example: A homeowner in Rogersville had a minor stain appear near a skylight each spring. He applied sealant himself twice over two years. On the third year, Roov was called after the stain spread to an adjacent wall. The skylight step flashing had been leaking the full time, and the decking on three sides of the skylight had rotted. The repair was significantly more costly than an early roof flashing repair would have been.
For a broader look at how delayed roof repairs compound costs, our leaky roof repair guide covers the full spectrum of what waiting costs Southwest Missouri homeowners.
What Roov Checks During a Free Flashing Inspection
When Roov performs a free roof inspection in Marshfield or anywhere across our service area, flashing is a dedicated part of every evaluation, not an afterthought.
Our inspection covers every flashing point on the roof. That includes chimney base and counter flashing, all pipe boots, valley metal, any skylights, and step and wall flashing at every dormer or addition. We photograph each point and include the condition in your Roof Condition Report with clear descriptions of what we found and what it means.
If we find flashing failure, we tell you exactly what it is, what caused it, and what the repair involves. We also help you determine whether the damage qualifies as a storm event under your homeowners policy or falls under normal wear. The GAF storm damage inspection guide describes the professional approach to separating storm damage from gradual wear, a critical distinction if you’re considering a claim. There is no cost for the inspection and no pressure to do anything at all.
Frequently Asked Questions
Q: What is roof flashing and what does it do? Roof flashing is thin metal installed wherever your roof meets a chimney, pipe, wall, valley, or skylight. It seals those transition points and forces water off the roof rather than through the gap. Without flashing, or with failed flashing, water has a direct path into your home at exactly the points shingles cannot protect. Knowing what is roof flashing and where it fails is the most important thing a homeowner can understand about roof leaks.
Q: How do I know if my roof flashing is leaking? Common signs include ceiling stains near a chimney, skylight, or exterior wall; wet attic insulation below a flashing point; rust streaks on brick below a chimney; and visible gaps or cracked sealant around any pipe or flashing metal. A roof flashing leak in Marshfield MO and other parts of Southwest Missouri is often the cause when a leak appears only after certain wind directions or rain intensities. If you have any of those signs, schedule a free inspection rather than waiting.
Q: How long does roof flashing last in Missouri? Galvanized steel flashing typically lasts 20 to 30 years. Aluminum can last longer under good conditions. The weak link is almost always the rubber pipe boot collar, which can degrade from Missouri’s UV intensity and heat in as few as 10 to 15 years. Sealant caulk around skylights and wall flashing often needs attention every 5 to 10 years even when the metal itself is sound.
Q: Can I repair roof flashing myself? A minor sealant touch-up around a pipe boot is a reasonable temporary fix for a careful homeowner. But chimney flashing, valley flashing, skylight flashing, and step flashing all require professional skill because they’re integrated with the shingles. An improper repair often leaks worse than the original failure. For anything beyond a temporary patch, call a professional for a proper roof flashing repair.
Q: Does homeowners insurance cover flashing leaks? It depends on the cause. Flashing that failed from a sudden storm event, such as hail cracking a pipe boot or wind lifting step flashing, is generally covered under most standard Missouri homeowners policies. Gradual wear and age are typically treated as maintenance by insurers and declined. Roov’s inspection documents the cause precisely, which matters significantly if you plan to file a claim.
Q: What is the difference between step flashing and counter flashing? Step flashing is a series of small metal pieces woven between shingle courses along a sloped surface, such as a chimney side or dormer wall. Counter flashing is a separate piece that sits over the step flashing and is embedded into the chimney mortar joint. Both must work together to form a complete seal. A failure in either one opens the same leak path.
Q: How much does a roof flashing repair cost in Southwest Missouri? A targeted roof flashing repair in Southwest Missouri typically runs $350 to $500 depending on type and location. Chimney flashing that requires mortar work or a full re-flash costs more. The comparison that matters most is against what ignoring the leak costs: $3,000 to $5,000 or more in decking rot, insulation replacement, mold remediation, and drywall repair when a small flashing failure is left unaddressed for a season or two.
Q: How often should flashing be inspected? According to NRCA professional inspection guidelines, at least twice per year, in spring and fall, is recommended, with all flashing points included. In Missouri’s climate, inspections after significant hail or wind events are also wise, since both can damage pipe boots and sealant in ways that are impossible to see from the ground.
Key Takeaways
- Flashing causes most mystery leaks. The five main flashing points (chimney, pipe boots, valleys, skylights, and wall and step flashing) are where water most often enters when shingles look intact.
- Freeze-thaw cycles are the primary enemy. Repeated expansion and contraction over multiple seasons cracks sealant and lifts metal, even on roofs that look perfectly fine from the street.
- Pipe boots fail first. UV and heat in Missouri can degrade rubber boot collars in 10 to 15 years, well ahead of the rest of the roof system.
- Inside signs come early. A ceiling stain near a chimney or exterior wall after heavy rain is a flashing alert, not something to watch and see.
- Waiting multiplies the cost. A $350 to $500 roof flashing repair Missouri homeowners delay for one to two seasons regularly becomes a $3,000 to $5,000 structural problem.
- Most flashing repairs require a professional. Only minor sealant touch-ups fall within safe DIY territory. Everything else requires proper integration with your shingle system.
- Inspections find it before it spreads. Roov checks every flashing point in every free inspection, with photos and a written Roof Condition Report documenting what’s there.
Ready To See What Your Flashing Is Hiding?
You now know where flashing lives, why Missouri weather beats it up, and what a small ignored leak actually costs. Let Roov check every flashing point before the next rain event finds one first.
Roov serves Marshfield and all of Webster County, along with Nixa, Springfield, Ozark, Lebanon, Republic, and communities across all eight counties of Southwest Missouri. Every free inspection includes a full flashing evaluation with all locations photographed and documented in your written Roof Condition Report.
Call 417-370-1259 or schedule your free inspection online.
Roov | Roofing with a Purpose | Serving Southwest Missouri