Pipe Boots, Ridge Caps, and Drip Edge: The Small Roof Parts That Cause Big Problems When They Fail
Most homeowners know to look at their shingles after a storm. What they miss are the three small components that cause more leaks, more rot, and more hidden damage than shingles ever do: pipe boots, ridge caps, and drip edge. This guide explains what each one does, why Missouri’s climate beats them up fast, how to spot early failure from the ground, and what happens to your roof and your home when these parts are ignored long enough.
TLDR: Pipe boots seal the pipes that poke through your roof. Ridge caps protect the peak and hips. Drip edge keeps water from wicking behind your gutters into your fascia. All three are small, all three are inexpensive to fix early, and all three become expensive problems when overlooked for a season or two. A free Roov inspection checks every one of them.
Walk out to the driveway and look at your roof. You can probably see the shingles clearly. You might notice the gutters. What you almost certainly cannot identify from that distance are the rubber collar around the plumbing vent pipe, the individual shingle pieces capping the ridge line, or the metal strip tucked under the first row of shingles at the edge. Those are the parts this article is about, and they are the parts most likely to fail before the shingles around them show any visible wear at all.
The Small Roof Parts Most Homeowners Never Think About
Before getting into what goes wrong, it helps to know exactly what these three components are and where they live on the roof.
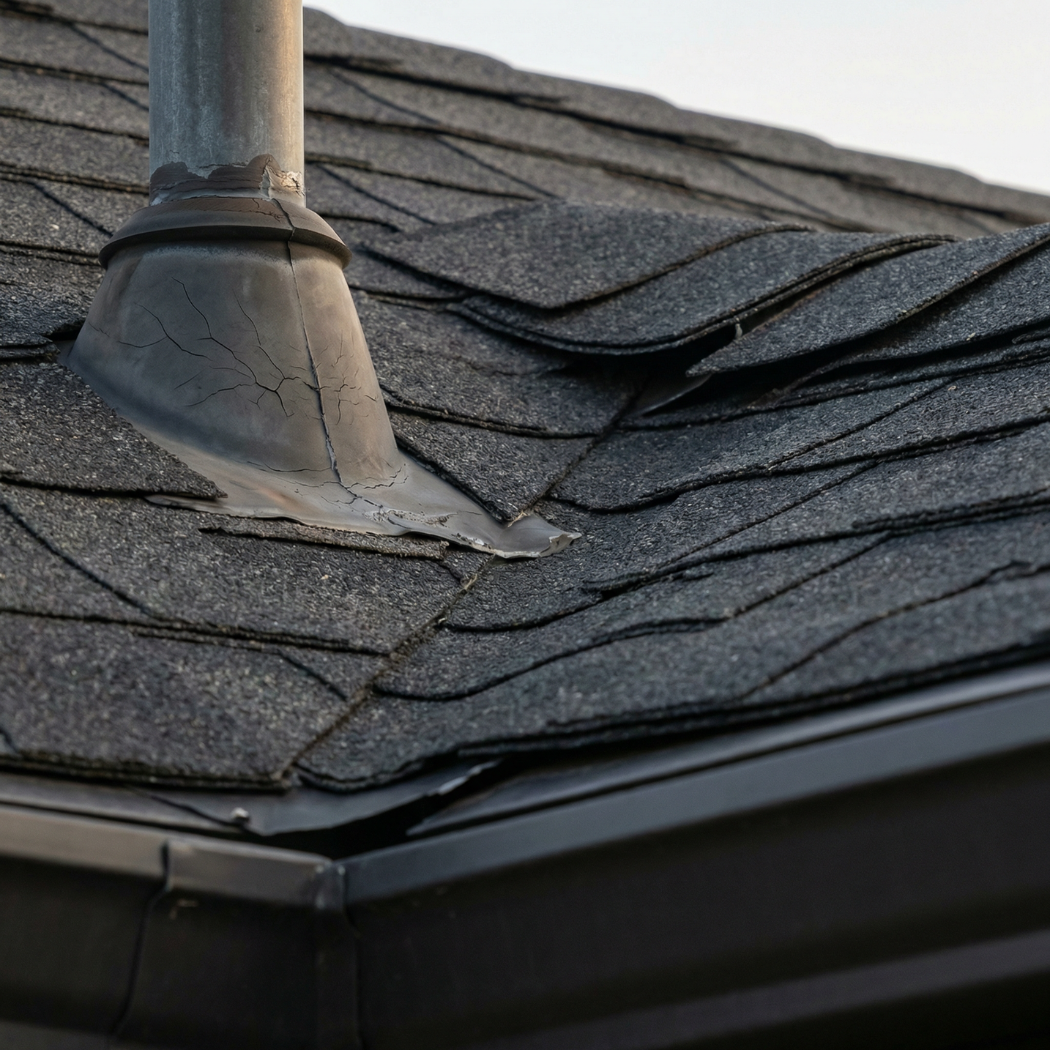
A pipe boot (also called a vent boot or rubber boot) is the collar that seals each spot where a pipe or vent stack pokes through the roof deck. Most homes have two to five of them. From the ground, they look like a metal base flange with a dark rubber or neoprene ring around the pipe itself. That rubber ring is the vulnerable part.
A ridge cap is the row of individual shingle pieces that runs along the peak of the roof (the ridge) and along the angled hip lines where two roof slopes meet. These are not full-size shingles. They are smaller, folded pieces installed one at a time in an overlapping pattern. They sit at the very highest and most exposed point of the entire roof system.
Drip edge is a metal strip, usually aluminum or galvanized steel, installed along the roof edge at the eaves and rakes. It tucks under the first course of shingles and hangs over the fascia board, creating a gap that channels water away from the wood rather than letting it wick behind the gutter.
The table below shows where each part lives, what job it does, and what failure looks like from the ground.
| Part | Where It Is | What It Does | What Failure Looks Like From the Ground |
|---|---|---|---|
| Pipe boot | Around each vent pipe sticking through the roof | Seals the gap between pipe and roof deck; prevents water entry at the penetration | Cracked or wrinkled rubber ring; rust staining below the pipe on shingles; ceiling stain near a bathroom or kitchen |
| Ridge cap | Along the peak (ridge) and hip lines | Covers and waterproofs the joint where two roof slopes meet; first line of defense against wind-driven rain at the apex | Missing pieces; curled edges; exposed nails; dark staining along the ridgeline; daylight visible at corners |
| Drip edge | Metal strip at the roof edge, under shingles, over fascia | Directs water off the roof and into the gutter; prevents wicking into fascia and soffit; holds perimeter shingles against wind uplift | Missing metal at the eave; rust-stained fascia; gutters pulling away; peeling fascia paint directly below the shingle edge |
Pro tip: The best time to look at these parts is right after a storm, when lighting is good and your attention is on the roof. Take binoculars. Look specifically at the pipe boot collars, the ridgeline, and the metal edge strip at the eave. Each of those areas tells you something shingles alone cannot.
Pro tip: If you can see dark staining running down from a vent pipe on the shingles below it, that stain is almost certainly evidence of a failed or failing pipe boot. The stain appears when water enters around the pipe and carries dirt and algae down the shingle surface beneath the boot.
Pipe Boots: Tiny Collars, Big Leaks
Every home with plumbing has at least one vent stack poking through the roof deck. That stack allows air into the drain system so water flows properly through the pipes. Where the stack penetrates the roof, a pipe boot creates the seal. If the boot fails, every rain event becomes a potential leak event directly into the interior of your home.
What a Pipe Boot Is Made Of and Why It Fails
Traditional pipe boots use a rubber or neoprene collar that sits on a metal base flange. The flange is nailed to the roof deck and overlapped with shingles, but the collar itself is an exposed rubber component sitting directly under the sun, rain, and hail. In Southwest Missouri, UV radiation and summer heat are relentless. According to GAF’s guide to rooftop accessories and pipe penetrations, plumbing vent pipe penetrations are among the most vulnerable spots on any roof, and degraded collars or improper installation are the leading causes of leaks at those points.
Rubber boot collars in Missouri’s climate typically begin to crack, shrink, or dry-rot within 10 to 15 years. The rubber loses its flexibility first, then cracks develop, often starting at the top edge of the collar where it contacts the pipe. Those cracks may be minor enough that they stay dry under light rain but open under sustained heavy downpours. A homeowner can live with a slowly failing boot for years, watching a ceiling stain appear after every major storm and dry out in between, until the crack widens enough to cause active dripping.
How to Spot a Failing Pipe Boot From the Ground
From the driveway or yard, look for rubber collars that appear shrunken or wrinkled rather than sitting flat and tight against the pipe. On an older roof, a boot that was once flush and smooth will look puckered or pulled away from the pipe at the top edge. Any visible cracking in the rubber, even a hairline, is a repair indicator.
Inside the home, the most common sign of a pipe boot leak is a ceiling stain that appears near a bathroom, laundry room, or kitchen, specifically in a location near or directly below where a vent stack exits the roof. The stain may dry out between storms, which leads many homeowners to assume the leak fixed itself. It has not. The boot gap is still there; it only leaks when rain volume or wind direction activates it.
The table below shows how different pipe boot materials hold up over time in Missouri’s climate so you know what you are working with on your specific roof.
| Boot Type | Material | Typical Lifespan in Missouri | Main Failure Mode | Upgrade Option |
|---|---|---|---|---|
| Standard rubber/neoprene | Rubber collar on metal base | 10 to 15 years | UV cracking and shrinkage | All-metal boot system |
| Lead flashing boot | Lead collar on lead base | 20 to 30 years | Physical damage, rare UV failure | Still used; inspect periodically |
| All-metal (e.g., GAF Pivot) | Galvanized steel, no exposed rubber | 30 to 50 years | Virtually none with proper installation | Best current option for longevity |
| Neoprene with aluminum base | Rubber collar on aluminum flange | 12 to 18 years | Collar degrades; flange outlasts it | Replace collar only if base is sound |
Pro tip: When trying to locate a pipe boot stain on your ceiling, trace the stain toward the exterior wall or toward the attic access. Water from a boot leak enters at the pipe penetration point and then travels along the rafter or roof deck before dripping. The stain on your ceiling may be several feet from the actual entry point.
Pro tip: Pipe boot replacement is one of the lowest-cost roof repairs available. A single boot swap by a professional typically takes less than an hour and costs a small fraction of what the ceiling, insulation, and drywall damage costs when a boot leak runs uncorrected for a full season.
Ridge Caps: The First Shingles to Take Wind and Sun
The ridge of your roof is the highest point on the structure. If your home has a gable-end design, the ridge runs front to back along the peak. If it has a hip design with four sloping sides, the hips run diagonally from the corners down to the eaves. Both the main ridge and the hips are covered with ridge cap shingles, and both experience more stress than any other part of the roof.
Why the Ridge Is the Most Exposed Spot on the Roof
Height means exposure. Wind velocity increases with height above the ground, which is why ridge caps bear the brunt of every wind event that rolls through Southwest Missouri. Southwest Missouri spring storms, which frequently produce gusts above 50 mph, hit ridge caps from multiple directions simultaneously. Standard field shingles have the advantage of overlapping with neighbors that hold them down. Ridge caps sit alone at the peak with only their own nails and adhesive strip holding them in place.
Sun exposure is equally severe. The ridge receives direct sunlight from morning to afternoon with no shading, and the angle of the shingles maximizes UV contact across the folded surface. Combined with Missouri’s summer heat, this accelerates granule loss and causes the asphalt to dry and stiffen faster than field shingles installed lower on the slope.
According to GAF’s overview of hip and ridge cap shingles, when installers use cut-up 3-tab strip shingles in place of manufactured ridge cap products, wind speed coverage and warranty protection are both reduced compared to properly designed ridge cap pieces, which is part of why older or improperly installed roofs show ridge failures sooner than the field shingles below them.
What Failing Ridge Caps Look Like
Missing ridge cap pieces are the most obvious sign of failure. After a wind event, the yard often contains small folded shingle pieces that came from the ridge or hip lines. Each missing piece leaves the underlying ridge board and roof deck exposed to direct water entry right at the peak of the structure.
Curled edges on remaining ridge cap pieces mean the adhesive seal has failed. A ridge cap piece with a visibly lifted corner is not just cosmetic; it is inviting the next wind event to remove the piece entirely and allowing rain to push under the edge in the meantime. Exposed nail heads visible on the ridge line mean ridge caps have either shifted or lost granule coverage at the nail penetration points. Each exposed nail is a potential rust point and a direct water path into the deck below.
Pro tip: Binoculars are the right tool for evaluating ridge caps from the ground.
Pro tip: If you had a windstorm recently and you notice a few irregular-shaped shingle fragments in the yard that do not look like full shingles, they are almost certainly ridge cap pieces. Ridge caps are smaller and folded, so they look different from flat field shingles when they land in the grass. Finding them in the yard means the ridgeline has open gaps right now. Look along the full ridge and both hip lines. Any dark spot in a consistent color ridge line is a missing or heavily granule-depleted piece. Any piece that appears to sit at a different angle from its neighbors has likely lifted at the nail line.
Drip Edge: The Metal Strip Protecting Your Roof Edge and Fascia
Drip edge is the least glamorous component on the list and also the one most likely to be installed incorrectly, missing entirely, or corroded past usefulness on older Missouri homes. Its job sounds simple: keep water from wicking back under the shingles and into the fascia. But when it fails or is absent, the damage it prevents becomes very real very quickly.
What Drip Edge Does and Why It Matters
Picture the edge of your roof. Shingles extend past the deck, but there is still a gap between the bottom of the shingles and the top of the fascia board where the gutter is attached. Without drip edge, water running off the shingles follows surface tension along the underside of the shingle and wicks directly onto and behind the fascia. That moisture soaks into the wood continuously through every rain event, accelerating rot in the fascia and in the rafter tails directly behind it.
Drip edge breaks that wicking path. The metal projects past the fascia board so water drips away from the wood and into the gutter below. It also holds the perimeter shingles down against wind uplift, which is why the International Residential Code has required drip edge at all eaves and rakes of asphalt shingle roofs since 2012. As covered in depth by Professional Roofing magazine’s NRCA-sourced guide on drip edge installation, NRCA recommends drip edge at all eaves and rakes for asphalt shingle roofs, and the wind resistance benefit at the roof perimeter is as significant as the water management benefit.
What Happens When Drip Edge Is Missing or Wrong
Homes built or re-roofed before 2012 often lack drip edge entirely, or have an older style that does not provide adequate projection past the fascia. Homes where drip edge was installed in the wrong sequence, with underlayment over the drip edge at rakes rather than under it, can actually direct water behind the fascia rather than away from it.
Corroded drip edge loses its protective profile as the metal thins and bends inward. Bent drip edge from physical damage, such as a falling branch or a gutter installation gone wrong, creates low spots where water pools at the edge rather than shedding away. Any of these conditions leads to the same outcome: continuous moisture exposure on the fascia board behind the gutter, which produces rot, gutter failure, and eventually roof decking damage at the eave line.
Pro tip: You can see drip edge from the ground by looking closely at the roof edge where the shingles meet the gutter. The metal strip should be visible extending slightly past the fascia. If you see wood directly under the shingle edge with no metal visible, there is either no drip edge or it is badly corroded. Either condition needs professional attention before the next wet season.
How Small Failures Turn Into Big Damage: Missouri Examples
The pattern is consistent across every community Roov serves. A small part fails quietly. The homeowner does not notice or decides to deal with it later. Six months pass. A year passes. The repair scope triples.
The table below shows how each small failure evolves when it goes unaddressed.
| Part Failing | Initial Visible Problem | 6-Month Outcome | 2-Year Outcome Without Repair |
|---|---|---|---|
| Cracked pipe boot | Ceiling stain near bathroom after heavy rain; stain dries between storms | Insulation directly above stain is wet and beginning to compress; stain grows | Roof deck surrounding boot is soft; insulation is molded; drywall replacement required |
| Missing ridge cap piece | Small gap at ridgeline after windstorm; not visible from street | Water entering at peak after each storm; attic shows wet rafter section | Roof deck at ridge is soft; potential water entry into wall framing below the ridge |
| Missing or corroded drip edge | Fascia paint beginning to peel along eave line | Fascia board soft in 2 to 4 sections; gutter pulling away at those points | Full fascia replacement required; rafter tails rotting; potential decking replacement at eave |
Real example: A homeowner in Sparta noticed a slow ceiling stain appearing directly above the bathroom after hard spring rains. The stain dried between events and seemed manageable. Two seasons later, Roov was called after the stain grew large enough that the drywall began to soften. The pipe boot above that bathroom had been cracked for over 18 months. The boot replacement itself was a minor repair. The ceiling drywall, insulation, and attic decking in that area required additional work that added significant cost. The total repair scope was roughly six times what a prompt boot replacement would have cost.
Real example: A homeowner in Nixa had a windstorm remove three ridge cap pieces from the hip line above the garage. She could see the dark gap in the ridgeline but assumed it was a cosmetic issue. Eight months later, water was tracking down the rafter below the exposed hip through a full rainy season and collecting in the attic insulation above the garage ceiling. A targeted roof repair addressing the ridge cap and the saturated insulation beneath it was required. The ridge cap replacement alone would have taken under an hour.
Real example: A homeowner in Bolivar noticed gutters pulling away on the back of the house during a heavy spring storm. The fascia behind the sagging section had been rotting for two seasons, driven by absent drip edge on a section that had been re-roofed 15 years earlier without proper edge metal. By the time Roov arrived, the rot extended behind three gutter sections, one rafter tail had softened, and the first 12 inches of roof decking along the eave needed replacement. The cost of installing drip edge correctly during the original re-roof would have been minimal. The delayed repair was not.
Real example: A homeowner in Branson had three pipe boots replaced during a full roof installation in 2009. By 2022, none of the boots had ever been inspected. After a heavy spring storm, a slow drip appeared in the hallway ceiling far from any exterior wall, which the homeowner attributed to condensation. Roov’s inspection found two of the three original rubber boot collars had cracked through, with one collar so degraded it had pulled almost completely away from the pipe. Water had been entering at two points simultaneously for at least one full rainy season. Both boots were replaced. The ceiling damage was limited because the homeowner called before waiting through another season.
Real example: A homeowner in Rogersville purchased a home that had been re-roofed four years prior. Drip edge had not been installed during that re-roofing project, a detail no home inspector had flagged. Within two years of moving in, the fascia on the north eave began peeling, then softening. By the time Roov was called, the fascia along the full north side needed replacement, and one rafter tail had begun to soften. Retroactive drip edge installation required gutter removal, fascia replacement, and reinstallation of both the gutter and the edge metal. Total cost was significantly higher than the drip edge installation alone would have been at the time of the original re-roof.
DIY Check vs. Pro Repair: Where To Draw the Line
There is useful work a homeowner can do from the ground or from a safe ladder height, and there is work that creates real risk without improving the outcome. Knowing the line between them matters.
The following table clarifies the line between safe homeowner action and work that requires professional tools and roof access.
| Action | Safe for Homeowner | Why | Notes |
|---|---|---|---|
| Binocular inspection of pipe boots, ridge caps, drip edge | Yes | Ground level; no physical risk | Best done in good light after a storm |
| Photographing from ground or ladder at eave height | Yes | No roof surface contact needed | Use wide and close-up shots |
| Attic check with flashlight after rain | Yes if attic is accessible | Safely identifies wet area without roof access | Do not step on drywall or insulation |
| Temporary caulk on a visible pipe boot crack | Limited | Only if surface is clean, dry, and reachable safely | Not a repair; buys time only |
| Walking a pitched roof to inspect | No | Wet or damp asphalt is extremely slippery | Falls from residential roofs are often fatal |
| Removing or re-positioning ridge cap pieces | No | Improper removal causes additional damage and the pieces rarely reseal | Always a professional repair |
| Adjusting or removing drip edge | No | Correct sequence involves underlayment; DIY attempts create gaps | Leave this to a roofer with proper tools |
What you can safely do yourself:
A slow walk around your home with binoculars after any significant storm is the single most useful thing a homeowner can do to catch these issues early. Focus specifically on the pipe boot collars (look for cracked or wrinkled rubber), the ridge and hip lines (look for missing or lifted pieces), and the metal edge at the eaves (look for rust, absence of metal, or visible wood below the shingle edge). Photograph anything that looks abnormal with your phone.
If you have safe ladder access to a single-story eave and the weather is dry, you can look closely at the drip edge condition and the gutter attachment without getting on the roof itself. Similarly, checking the attic with a flashlight after a rain event can locate the approximate entry point of any active leak, which helps a roofer diagnose faster when they arrive.
Very minor temporary caulking around a visibly cracked pipe boot collar can buy time until a professional repair, but only if the surface is clean and dry, only if you can reach it safely without walking a pitched roof surface, and only with the understanding that caulk is not a repair. It is a delay tactic.
What you should not attempt:
Walking a pitched roof without professional experience and proper footwear is dangerous and produces little useful information even when successful. Do not pry up ridge cap pieces to investigate what is beneath them; improper removal almost always causes additional damage and the repositioning rarely seals properly. Do not remove or attempt to reposition drip edge; the correct installation sequence involving the underlayment means any DIY attempt at adjustment tends to create gaps rather than close them.
The clear signal to call Roov rather than investigate further yourself: if you see any of the following, the right step is a professional inspection rather than a DIY attempt, because each condition indicates something beyond surface wear that requires proper diagnosis and repair: ceiling stains after rain, missing ridge cap pieces, gutters pulling away from the fascia, visible rust at the drip edge, soft spots on any section of fascia you can reach safely, or any crack or separation visible in a pipe boot collar.
Pro tip: Photographing the condition of your pipe boots, ridge caps, and drip edge after a storm
Pro tip: If your home has been re-roofed at any point in the last 20 years without you being involved in the process, check the drip edge condition specifically. Drip edge is the component most commonly skipped by contractors trying to cut time or cost, and you would not know it was missing just by looking at the finished shingles from the ground.
Pro tip: Ridge cap pieces installed starting from the end opposite the prevailing wind direction shed water more reliably than those installed in the other direction. If you are having ridge caps replaced after a repair, ask your contractor to start from the correct end for your roof’s orientation. gives you a baseline record. If you revisit those photos six months later and the condition has changed, that progression documents the timeline of a developing problem, which matters for both diagnosis and any potential insurance claim.
Pro tip: If you are scheduling any work that requires a contractor on your roof, even something unrelated to roofing, ask them to photograph the condition of the pipe boot collars and ridge caps while they are up there. A roofer, HVAC technician, or chimney sweep can give you a visual status report at no extra cost and document anything worth addressing.
Pro tip: If you are scheduling any exterior maintenance, such as gutter cleaning, that puts a contractor at eave height, ask them to note the condition of the drip edge and the fascia directly above the gutter while they are there. That adds no time to their work and often surfaces problems you would not otherwise know about.
How Roov Checks These Parts on Every Free Inspection
When Roov performs a free roof inspection in Sparta or anywhere across our service area, these three components are part of a specific checklist that goes beyond shingles. Most homeowners who call for an inspection describe a shingle concern, but the Roof Condition Report we produce covers the full perimeter and all penetration points because the shingles are frequently not where the problem actually lives.
On pipe boots, we assess each collar for cracking, shrinkage, separation from the base flange, and UV degradation. We photograph each boot from close range and include the condition rating in the report with a plain-English description of what we found and what it means for your home.
On ridge caps, we walk the full ridgeline and all hip lines, checking for missing or displaced pieces, nail exposure, adhesive seal failure, and granule coverage. Missing pieces are documented by location so repairs can be targeted precisely rather than guessing which sections need work.
On drip edge, we evaluate material condition, correct projection past the fascia, installation sequence relative to the underlayment, and whether the metal is properly integrated with the gutter system. We also check the fascia immediately behind the drip edge for early signs of moisture intrusion, since the fascia often shows damage before the drip edge itself looks obviously failed.
The complete Roof Condition Report documents every finding with photographs and a straightforward explanation of what needs immediate attention, what should be monitored, and what is performing well. We tell you honestly if a repair to one of these small components is all you need. If we find conditions that suggest the broader roof system has more extensive issues, as covered in our detailed discussion of hidden roof damage patterns, we explain exactly why and what the options are.
Frequently Asked Questions
Q: How long do pipe boots usually last in Missouri? Traditional rubber or neoprene pipe boot collars typically last 10 to 15 years in Missouri’s UV and heat conditions. Metal base flanges can last much longer, but the collar is the weak link. All-metal pipe boot systems like GAF’s Pivot design have significantly longer service life because they eliminate the rubber collar entirely. If your roof is more than 12 years old and has never had the pipe boots replaced or inspected, they are worth checking this season.
Q: Can a bad pipe boot cause a ceiling stain far away from the vent pipe? Yes, and this is one of the most common diagnostic errors homeowners make. Water entering at a pipe boot follows the path of least resistance, which is usually along the underside of the roof deck or along a rafter. It can travel several feet before it finds a low point and drips. A ceiling stain eight feet from where a vent pipe exits the roof is not unusual for a boot leak. Professional inspection traces the water path from the stain back toward the entry point rather than assuming the stain location is the source.
Q: What happens if my roof does not have drip edge? Without drip edge, every rain event deposits water onto the top edge of the fascia board and allows it to wick behind the gutter. Over time this produces rot in the fascia, then in the rafter tails behind it, then in the roof decking at the eave. The rot is invisible behind the gutter until it is advanced enough that the gutter begins to sag or pull away. Adding drip edge to an existing roof at eave height requires removing and reinstalling the gutter, but the cost is modest compared to the fascia and decking replacement that drip-edge-free roofs eventually require.
Q: Do ridge caps cost a lot to replace? A targeted ridge cap repair covering a single hip or a portion of the main ridge is generally one of the lower-cost roof repairs available. Full ridge and hip re-capping at the time of a complete roof replacement adds relatively little to the total project cost and is standard practice. Addressing missing or failed ridge cap pieces promptly, before water has been entering at the exposed point through multiple seasons, keeps the repair scope contained to the cap itself rather than expanding into underlying deck replacement.
Q: Is pipe boot, ridge cap, or drip edge work covered by homeowners insurance? It depends on the cause and on your policy. Damage to these components from a sudden covered event, such as hail cracking a pipe boot collar, wind removing ridge cap pieces, or storm debris bending and separating drip edge, is generally covered under standard Missouri homeowners policies if the event can be documented. Gradual wear, UV degradation, and age-related deterioration are typically classified as maintenance by insurers and excluded. Roov documents the cause in every Roof Condition Report, which helps you understand whether a claim is appropriate before filing.
Q: Can I wait until I replace the whole roof to fix these parts? You can wait for ridge cap and drip edge issues if the damage is minor and the replacement is scheduled within the current season. A missing ridge cap piece or a section of degraded drip edge on a roof you are re-roofing in two months is a calculated risk, not a disaster. What you should not delay is an active pipe boot leak, because every rain event that runs through a failed boot adds moisture to your roof deck, insulation, and ceiling structure. Deck rot that develops over one or two more seasons before a replacement happens will increase the re-roofing cost significantly.
Q: My roof is only 8 years old. Should I be worried about these parts already? At 8 years, ridge caps and drip edge on a properly installed roof should still be performing well. Pipe boot collars are the one component worth checking on a relatively young roof, especially after a significant hail event. Hail that is large enough to dent your gutters can crack a rubber boot collar even on a recent installation. A visual check of the boot collars every few years, especially after major storms, catches the rare early failure before it produces any interior damage. The other parts, ridge caps and drip edge, become higher priority in the 10 to 15 year range.
Q: How do I know from the ground whether my drip edge is actually doing its job? Look at the roof edge where the shingles meet the gutter. You should be able to see a thin metal strip extending slightly past the face of the fascia board. If you see wood directly below the shingle edge with no metal visible, drip edge is absent or fully corroded. If the fascia paint is peeling in a band along the full eave line, water is wicking into the wood consistently, which points to drip edge failure regardless of whether metal is visible. If the gutters are pulling away from the fascia at multiple points, that is a late-stage sign that the fascia behind the gutter has been rotting, usually from long-term drip edge failure.
Key Takeaways
- Pipe boots are the shortest-lived part on most roofs. Rubber collars in Missouri’s UV and heat typically begin failing between 10 and 15 years. They are inexpensive to replace early and expensive to ignore.
- Ridge caps take more wind, sun, and hail than any other part of the roof. Missing or failed ridge cap pieces leave the peak of the structure directly exposed to water entry and are among the most urgent small repairs a Missouri homeowner can make.
- Drip edge does two jobs. It protects the fascia from water wicking behind the gutter, and it holds perimeter shingles against wind uplift. Missing or corroded drip edge is one of the leading causes of fascia rot on Missouri homes.
- The visible damage is rarely the full story. A ceiling stain, a missing ridge cap piece, or peeling fascia paint each indicate a problem that has already been developing for at least one season. The question is how far it has spread, not whether it exists.
- Small repairs done early cost a fraction of delayed repairs. The difference between a pipe boot swap and a partial deck replacement is almost always just time.
- Ground-level inspection misses all three of these parts. A professional inspection from Roov specifically evaluates pipe boots, ridge caps, and drip edge as a standard part of every free Roof Condition Report.
- Catching these issues before a roof replacement saves money on the replacement itself. Deck rot from any of these three failure points increases re-roofing cost when it has to be addressed at the time of the project.
Think Your Roof Is Fine? These Parts Say Otherwise.
Shingles that look intact from the driveway tell only part of the story. The pipe boots, ridge caps, and drip edge on that same roof may be failing right now without producing any visible sign from the street. Roov serves Sparta and all of Christian County, along with Springfield, Nixa, Branson, Bolivar, Lebanon, and communities across all eight counties of Southwest Missouri. Every free inspection covers these components specifically, with photographs and a plain-English Roof Condition Report.
Call 417-370-1259 or schedule your free inspection online.
Roov | Roofing with a Purpose | Serving Southwest Missouri