10 DIY Roof Maintenance Mistakes Missouri Homeowners Make That Cost Them Thousands Later
If you own a home in the Branson area, you probably handle a lot of your own maintenance. You mow the lawn, clean the gutters, fix the squeaky door. That kind of ownership instinct is genuinely valuable, and for most of the house it works well. The roof is the exception. Not because everything about it requires a professional, but because the mistakes that homeowners make on roofs tend to be invisible for months or years and then show up as expensive repairs with no obvious cause. This article covers the ten most common DIY roof mistakes that Roov finds in Missouri homes, what those mistakes actually cost over time, and the practical safe plan that lets you stay involved in maintaining your roof without damaging it.
TLDR: Most common DIY roof mistakes fall into two categories: things that physically damage the shingles or seal (pressure washing, walking on hot roofs, over-caulking, nailing through shingles), and things that create safety risk (wrong ladder angle, working alone, steep pitches without footwear). The safe DIY zone is from the ground: binoculars, gutter cleaning from a stable ladder at eave height, and photo documentation. Everything above the gutter line is Roov’s job.
You are not doing anything wrong by wanting to take care of your own roof. Most of the homeowners who come to Roov with preventable damage were genuinely trying to help. They pressure washed because they wanted the algae gone. They smeared caulk because they saw a gap and thought they were sealing a leak. They nailed a satellite dish bracket through the shingle because that is how the instructions said to do it. The problem is that roofing is one of those trades where doing it wrong looks exactly like doing it right until it does not.
Why “Helping” Your Roof Can Sometimes Hurt It
A roof is a layered system. Shingles, underlayment, ice and water barrier, decking, ventilation, and flashing all work together in a specific sequence to shed water and manage moisture. When a homeowner intervenes with a product, a tool, or a repair attempt that does not account for how that system works, the intervention often breaks one link in a chain that was doing its job. The water that was being shed correctly now has a path it did not have before, and that path may not show up as a ceiling stain for 18 months.
The goal of this article is not to scare you away from your own roof. It is to show you exactly where the safe line is, so you can stay on the right side of it with confidence.
The 10 Most Common DIY Roof Maintenance Mistakes
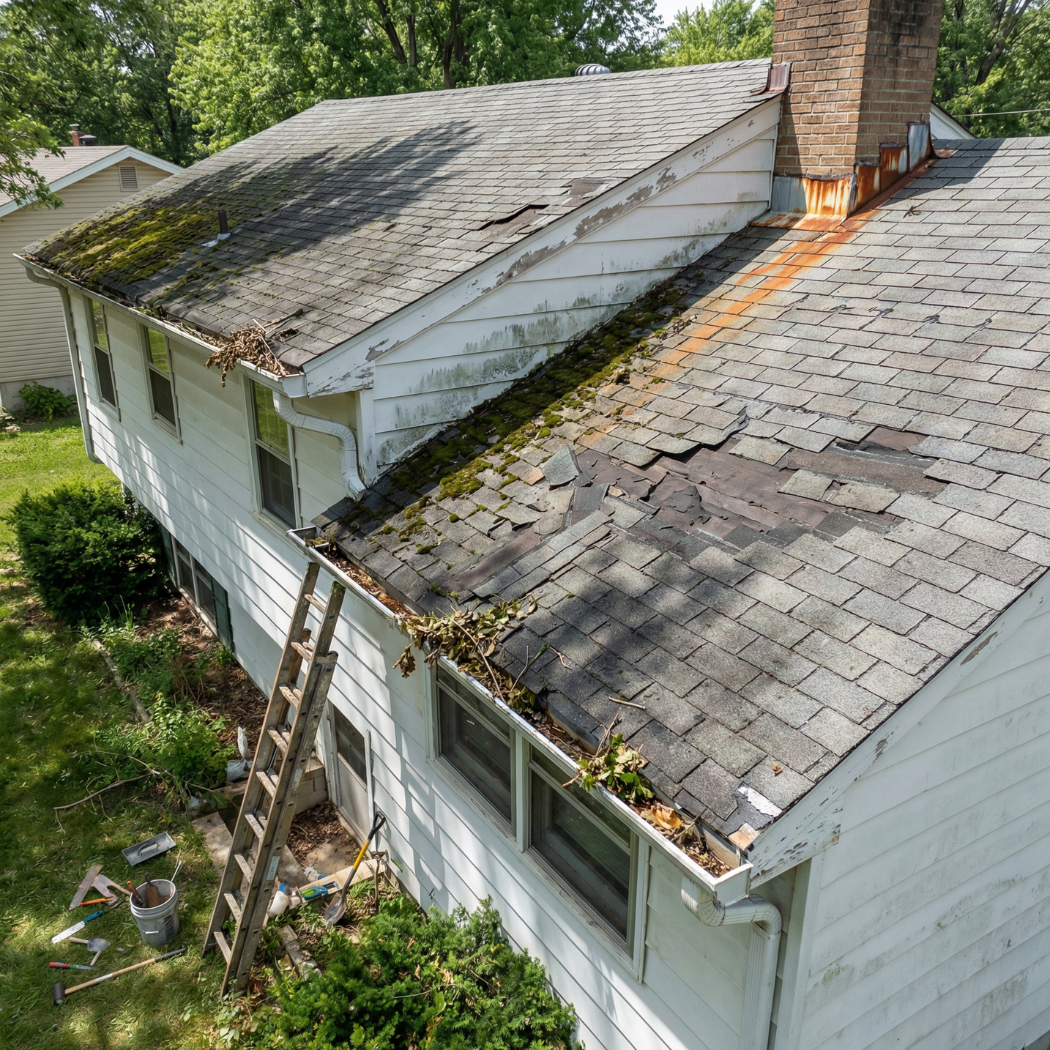
Mistake 1: Walking on Hot or Steep Shingles to Inspect
The single biggest risk most homeowners do not think about is the fall. Roofing contractors fall to injury and death at rates that make construction one of the most dangerous occupations in the country. According to the CDC’s ladder and fall safety guidance, many ladder-related injuries happen at home, and the leading cause is incorrect setup angle. That is before anyone even gets on the roof surface itself.
Beyond the fall risk, walking on asphalt shingles on a warm day scuffs off granules at every footstep. Granules are the protective layer that shields the asphalt from UV radiation and physical wear. Each granule-depleted scuff mark is a spot where the shingle ages faster. A homeowner who has walked a roof several times to “check on things” may have shortened its life by several years while never seeing a single leak.
Pro tip: Set a recurring phone reminder for the first weekend of April and the first weekend of October to do your ground-level walkthrough and attic check. These are the two best windows in Missouri: spring catches winter damage before hail season begins, and fall catches storm season damage before freeze-thaw cycles work on any vulnerabilities through winter.
Pro tip: You do not need to walk the roof to get useful information. A pair of binoculars from the driveway and the backyard covers everything visible from a street-level perspective, and a trained roofer’s attic check covers everything that is not.
Mistake 2: Pressure Washing the Roof
Algae streaks on a shingle roof are unattractive, and the instinct to power them away is completely understandable. But pressure washing an asphalt shingle roof is one of the most damaging things a homeowner can do to it. According to GAF’s technical guidance on algae and roof cleaning, high-pressure water releases enough force to dislodge granules and lift shingles. Their own technical documents explicitly state: do not use high-pressure sprays that could damage the protective granule coating. Once granules are knocked loose by water pressure, they are gone. The asphalt underneath is now exposed to direct UV radiation and the shingle’s clock is running faster than the manufacturer intended.
The correct approach for algae is a low-pressure application of a diluted bleach solution or a product specifically formulated for roof cleaning, applied from a garden hose with a spray attachment, never a pressure washer. Even better, let a professional handle it.
Pro tip: If you want to clean algae from your roof, test your solution on a small section first and wait 30 days before applying it broadly. Some products have subtle interactions with specific shingle formulations that are not apparent at first application. If the test section looks unchanged or worse after 30 days, do not proceed with the full application.
Pro tip: Algae-resistant shingles with zinc or copper granule technology are an option when the time comes for replacement. In Missouri’s humidity, algae on roofs is common and a professional cleaning done correctly extends the life of the shingles without the damage a pressure washer guarantees.
Mistake 3: Smearing Caulk Over Everything That Looks Wrong
This one is responsible for more delayed damage diagnoses than almost any other mistake. A homeowner climbs up, sees a gap around a pipe boot or a piece of flashing that looks slightly separated, and applies a thick bead of roofing caulk. It looks fixed. It is not fixed. What it is is hidden.
Caulk is a surface sealant. The gaps that cause real roof leaks are almost always behind or under the metal, in the mortar joint above the counter flashing, or at the interface between step flashing and siding. No amount of caulk on the surface seals a gap that exists behind the surface. What the caulk does is prevent a professional from seeing the underlying condition clearly at the next inspection, and it can actually trap water that found a way behind the sealant. By the time the leak reappears, the wood behind the flashing may have been rotting for a full season.
A small, clean bead of appropriate sealant applied precisely at a verified gap by someone who understands the flashing system is a legitimate temporary measure. A homeowner-applied smear of whatever caulk was in the garage is usually neither precise nor appropriate.
Mistake 4: Nailing or Screwing Things Through Shingles
Satellite dish installers, holiday decoration hangers, and homeowners mounting exterior signs have all done this. Each nail or screw driven through a shingle creates a penetration point with no flashing, no boot, and no seal other than the fastener itself. Initially, the fastener fills the hole and nothing leaks. Over a season or two, the fastener works slightly loose from thermal expansion, the hole opens a fraction, and a slow drip begins above whatever room is directly below.
The only correct way to mount anything to a roof surface is through a properly flashed and sealed penetration installed by someone who knows how to integrate it with the surrounding shingles and underlayment. If you need a satellite dish on the roof, have it mounted by a roofer, not by the cable company’s installer.
Mistake 5: Cleaning Moss or Algae With Harsh Chemicals
Bleach at the correct dilution, applied correctly, is a reasonable algae treatment. Undiluted bleach, acidic cleaners, or products not formulated for roofing use are not. These products can accelerate granule loss, alter the asphalt chemistry, and damage the fiberglass mat that gives architectural shingles their strength. Some homeowners have inadvertently voided their shingle manufacturer warranty by applying cleaning products not approved for use on the specific shingle type they have installed.
Before applying any chemical to your shingles, check your shingle manufacturer’s guidance. GAF, Owens Corning, and CertainTeed each publish cleaning recommendations for their products. If you cannot confirm the product is appropriate for your shingles, do not apply it.
Pro tip: Missouri’s combination of humidity, shade from mature trees, and moderate summer heat makes algae growth nearly universal on north-facing roof slopes older than 7 to 10 years. If your roof is in this category, address it with the correct diluted treatment rather than waiting for it to spread. Widespread algae is an indicator to professional inspectors that the granule layer has aged enough to be assessed carefully.
Pro tip: Low-concentration sodium hypochlorite (common bleach) diluted with water is the most commonly accepted approach for algae removal on asphalt shingles. Apply with a garden sprayer at low pressure, let it sit, and rinse gently. Do not scrub, do not pressure wash, and do not use products with high concentrations of acid or surfactants not designed for shingles.
Mistake 6: Blocking or Painting Over Vents
Soffit vents get painted over during exterior repaint projects all the time. Ridge vents get stuffed with insulation by homeowners trying to seal a drafty attic. Gable vents get blocked with foam to stop air infiltration in winter. Each of these seemingly sensible actions cuts off part of the attic ventilation system, which then builds up moisture and heat that shortens shingle life from below, promotes mold growth in the attic insulation, and in winter contributes to ice dam formation at the eave.
If you are repainting exterior trim, mask off every soffit vent before rolling paint. If you are adding attic insulation, use rafter baffles to maintain the airflow channel at the eave. If you feel cold air through a gable vent and want to stop it, the answer is adding attic floor insulation, not sealing the vent.
Mistake 7: Installing DIY Gutter Guards That Trap Debris
Gutter guards are attractive to homeowners who are tired of cleaning gutters. Some products work well when installed correctly. Many products sold at hardware stores trap fine debris like seed pods, pine needles, and shingle granules in the mesh while blocking the openings that the system depends on. The gutters fill up behind the guard, the water overflows directly onto the fascia, and the homeowner assumes the guard is working because large leaves are not in the gutter.
Before installing any gutter guard product, research it specifically for the types of debris common in your area. In the Branson area, oak leaf litter, acorns, and cedar debris are common and require a specific guard design. Many homeowners are better served by cleaning gutters twice a year than by installing a guard that creates a maintenance problem more complex than the one it solved.
Mistake 8: Cutting Tree Branches in a Way That Damages Shingles
A homeowner cutting branches over the roof with a pole saw or hand saw that lets the branch fall onto the roof is causing direct shingle impact damage with every branch. Branches dropped from height onto shingles crack surfacing, indent the mat, and in some cases create small punctures that later become slow leaks. The damage is subtle enough that it does not look like damage from the ground, and most homeowners do not associate a ceiling stain eight months later with the branch they trimmed in the spring.
When cutting branches over or near the roof, lower them with a rope rather than letting them drop. If the branches are large enough that controlling them is impractical, hire an arborist who has the equipment to remove them safely without impact on the roof surface.
Pro tip: After any trimming work near the roof, do a ground-level inspection specifically looking at the areas where debris may have landed. Branches that are lowered carefully rarely cause damage, but an accidental drop that hit the ridge cap or a valley is worth documenting and potentially having professionally evaluated before the next rain.
Pro tip: While trimming branches, keep a clear ten to fifteen foot gap between tree limbs and the roof surface. Branches that drag across the roof in wind events scuff granules continuously over every windy season, creating the same granule-loss pattern that pressure washing causes.
Mistake 9: Ignoring Ladder Safety and Using the Wrong Angles
Every year homeowners are seriously injured doing routine maintenance from ladders. The single most common cause, confirmed by CDC data, is a ladder base that slides out because the ladder was set at the wrong angle. Extension ladders are designed to be set at a 75-degree angle, which works out to roughly a 1-to-4 ratio: for every four feet of height, the base should be one foot out from the wall. A ladder set too steeply falls backward; a ladder set too shallowly slides out at the base.
Beyond angle, working alone at height with no one to stabilize the ladder base or call for help if something goes wrong multiplies the risk. If you are cleaning gutters or doing any eave-height work, have another person present. Use a ladder rated for your weight plus the weight of your tools. Never stand on the top two rungs of a step ladder or the top three rungs of an extension ladder.
Mistake 10: Not Checking the Attic and Only Looking From Outside
Many roof problems are visible in the attic before they appear on the exterior or the interior ceiling. Wet insulation, stained rafters, condensation on the roof deck, or a disconnected duct that is venting humidity directly onto the sheathing are all conditions that a flashlight check of the attic surfaces quickly. Homeowners who inspect their roofs only from the outside are seeing half the picture.
A seasonal attic check does not require getting on the roof at all. Pull down the attic stair or open the access hatch, bring a flashlight, and look for dark staining on the underside of the deck, wet or matted insulation, or any duct that appears to terminate without reaching an exterior vent. This five-minute check twice a year catches the kinds of developing problems that cost the most money when they are found late.
Pro tip: When doing your attic check, bring a piece of white paper or cloth along with your flashlight. Hold the paper against the underside of the deck in areas you are checking for moisture. Damp paper identifies active moisture more clearly than looking at the wood surface, which often looks dry even when moisture is present below the surface.
Pro tip: Do your attic check 24 to 48 hours after a significant rain event. Fresh wet spots are much easier to identify then than during dry weather, and the water trail on a rafter will point you toward the entry point.
What Homeowners Can Safely Do Themselves From the Ground
The safe DIY zone for most homeowners is anything that does not require getting on the roof surface or working at heights above the eave without a stable platform. The table below gives a practical reference for what is genuinely safe, what carries moderate risk that requires attention to technique, and what belongs to a professional.
| Task | Safe for Homeowner | Risk Level | Recommended Frequency |
|---|---|---|---|
| Ground-level visual inspection with binoculars | Yes | Low | After every significant storm and twice a year |
| Photographing roof surface from ground for roofer review | Yes | Low | Whenever anything looks different from the last check |
| Attic check with flashlight from hatch or stair | Yes if accessible safely | Low | Twice a year; after heavy rain |
| Gutter cleaning at eave height on single-story section | Yes with proper ladder technique and a partner | Moderate | Spring and fall minimum |
| Trimming small branches away from roof, controlled descent | Yes with rope assist and no overhead drop | Moderate | As needed when branches within 10 feet of roof |
| Applying diluted bleach solution to algae with garden sprayer | Yes at low pressure only | Moderate | As needed per manufacturer guidance for your shingle type |
| Walking pitched roof surface to inspect | No | High | Never; call Roov instead |
| Replacing shingles, flashing, or pipe boots | No | High | Professional work only |
| Pressure washing shingles | No | High | Never; damages granule coating |
| Adding or moving vents | No | High | Professional work only |
The table below is a quick reference for the tools and supplies that belong in a safe homeowner roof maintenance kit.
| Tool or Supply | What It Is For | What It Is Not For |
|---|---|---|
| Quality binoculars (8×42 or similar) | Ground-level visual inspection of roof surface, ridge, vents, and gutters | Walking the roof to get a closer look |
| Extension ladder (rated for your weight) | Gutter cleaning at eave height on single-story sections | Accessing steep roof surfaces above the eave line |
| Ladder standoff stabilizers | Keeping ladder away from gutters to prevent damage; stabilizing against wall | Making a steep pitch safe to work on; they do not make roof surface access safe |
| Garden hose with spray nozzle | Low-pressure rinsing of gutters; diluted bleach application to algae | Pressure washing shingles |
| Soft-bristle brush or leaf blower on low setting | Clearing debris from valleys at eave reach | Scrubbing shingles or disturbing granule surface |
| Smartphone camera | Documenting any area of concern for professional review | Identifying damage from the ground; that requires binoculars for accurate resolution |
Ladder standoff stabilizers
Keeping ladder away from gutters to prevent damage; stabilizing against wall
Making a steep pitch safe to work on; they do not make roof surface access safe
Garden hose with spray nozzle
Low-pressure rinsing of gutters; diluted bleach application to algae
Pressure washing shingles
Soft-bristle brush or leaf blower on low setting
Clearing debris from valleys at eave reach
Scrubbing shingles or disturbing granule surface
Smartphone camera
Documenting any area of concern for professional review
Identifying damage from the ground; that requires binoculars for accurate resolution
Pro tip: Before calling Roov, do your ground-level check and photograph anything that looks different from your baseline. That five minutes of documentation makes the inspection faster and more targeted. A roofer who knows where to look first on arrival is able to give you a cleaner, more specific report.
Tasks That Look Simple But Really Need a Pro
Some roof tasks look like they should be within the ability of a careful homeowner and are not, because of what they connect to in the larger roof system.
Replacing a lifted shingle is the most common example. Pulling back a shingle to insert a new one or re-nail a lifted one requires understanding how that shingle is integrated with the underlayment, the adjacent shingles, and the self-seal strip pattern. Done incorrectly, a re-nailed shingle creates new fastener penetrations that are not covered by the original installation pattern and leaves the underlayment disrupted in ways that allow water wicking. Roov can re-nail and reseal a lifted shingle correctly in minutes. A homeowner attempting the same repair often makes the adjacent area more vulnerable than it was before.
Flashing and pipe boot repairs fall into the same category. These components are integrated with both the roof surface and the underlying structure, and a repair that looks like a surface seal is often actually a structural reconnection that has to be integrated correctly or the water finds the gap at the next storm.
Adding or moving vents requires understanding the ventilation balance of the entire attic, not just cutting a hole and installing a fixture. An attic that was balanced with a specific soffit-to-ridge ratio becomes unbalanced when a new exhaust point is added without accounting for the intake capacity. This can create pressure differentials that actually draw conditioned air from the house into the attic, increasing both energy costs and moisture load.
For a detailed look at how to approach professional roof repair for these situations, Roov assesses the full system before recommending any individual component repair.
How DIY Mistakes Show Up Later As “Random” Leaks or Damage
The insidious quality of most DIY roof mistakes is that they do not produce immediate failures. The pressure-washed roof looks clean. The caulked flashing looks sealed. The nailed satellite bracket looks solid. The damage appears weeks, months, or sometimes years later, and by then the connection to the original action is invisible.
The progression typically works like this: pressure washing removes granules, which accelerates UV aging of the asphalt, which causes micro-cracking in the shingle surface over one or two seasons, which allows moisture infiltration during the following winter’s freeze-thaw cycles. By the time the ceiling stain appears, the homeowner has no idea why their three-year-old roof is showing failure.
Similarly, a nail driven through a shingle for a holiday decoration bracket fills the hole initially. When the bracket is removed and the nail pulled, the hole remains but is covered by the shingle surface above it. Over summer heat cycles, the shingle shifts slightly at the nail penetration. By the following fall, wind-driven rain finds the gap.
The following table connects each common DIY mistake to its typical long-term consequence so you can see the real cost of each error before it happens.
| DIY Mistake | Immediate Appearance | How Damage Develops | Typical Time to Visible Failure | Cost Comparison |
|---|---|---|---|---|
| Pressure washing shingles | Roof looks clean | Granule loss accelerates UV aging; asphalt surface micro-cracks | 1 to 3 seasons | Premature replacement vs. a professional cleaning |
| Nailing through shingles | Fastener fills hole | Thermal cycling loosens fastener; gap opens at penetration | 1 to 2 years | Deck repair plus shingle removal vs. proper flashing |
| Over-caulking flashing | Gap appears sealed | Water enters behind flashing; rot develops in hidden wood | 1 to 2 years | Structural repair vs. correct flashing reinstallation |
| Blocking soffit vents with paint | No immediate effect | Attic moisture builds up; mold develops on sheathing | 2 to 4 years | Mold remediation plus insulation vs. masking vents before painting |
| Dropping branches on roof | No visible cracking | Mat fracture weakens shingle; crack opens with freeze-thaw | 1 to 3 seasons | Section replacement vs. lowering branches with rope |
| Gutter guards trapping debris | Gutters appear clean | Overflow soaks fascia continuously through rain events | 1 to 2 seasons | Fascia replacement vs. guard removal and regular cleaning |
Real example: A homeowner in Branson pressure washed the south-facing slope of their roof in the spring to remove algae streaking. The roof was nine years old and had significant life remaining. Roov’s inspection the following fall, after the homeowner noticed more algae returning quickly, found concentrated granule loss across the entire south slope consistent with high-pressure water impact rather than normal aging. The south slope had aged by an estimated three to five additional years in a single cleaning. What would have been a twelve to fifteen year replacement became an eight to ten year replacement.
Real example: A homeowner in Nixa installed a holiday lighting rail on the eave with screws driven through the fascia and into the first shingle course. The installation was clean and tight. By the following February, a small but persistent drip appeared at the corner of the living room ceiling directly below one of the screw penetrations. The screw had been driven at an angle that penetrated both the shingle and the underlayment. Each rain event pushed water along the screw shank into the deck. The repair required shingle removal, deck patching, and shingle reinstallation.
Real example: A homeowner in Springfield noticed a gap at the counter flashing on one side of the chimney and applied a heavy bead of exterior window caulk around the base of the metal. The visible gap disappeared. Over the following season, water continued to enter behind the flashing through the mortar joint above the caulk line, ran down the inside of the chimney framing, and emerged at the ceiling near the fireplace. When Roov arrived, the surface caulk had to be removed before the actual repair could be assessed and the rot behind the flashing located.
Smart DIY Roof Maintenance Plan for Missouri Homes
Here is a realistic annual plan that keeps you actively involved in your roof’s health without creating any of the risks above.
In spring, after the winter storm season and before peak hail season, do a ground-level walkthrough of the full perimeter with binoculars. Look specifically at the ridge and hip lines, all pipe boot collars, the gutter line for any sagging or pulling, and the fascia for peeling paint that might indicate moisture from gutter overflow. Clean the gutters if they have debris from winter. Do a five-minute attic check 24 to 48 hours after the first significant spring rain.
In fall, after leaf drop and before the first hard freeze, clear debris from roof valleys and around chimney bases if you can do so safely from ladder height at the eave edge. Check gutters again and ensure downspouts are directing water away from the foundation. Do another attic check and look specifically for any moisture staining that appeared over summer or the early fall rain season.
After any major storm, do a photo documentation from the ground. Gutters, downspouts, vents, and the visible roof surface all tell you something about hail size and impact even before a roofer arrives. Having storm-dated photos is valuable for any future insurance conversation.
Schedule a professional roof inspection from Roov once every two to three years on a newer roof, and annually if the roof is more than 15 years old or has been through significant storm events. Our detailed discussion of spring roof maintenance covers the seasonal specific checks in more depth, with guidance on what to look for at each time of year.
The table below summarizes the annual maintenance calendar so you can reference it at a glance.
| Season | Safe Homeowner Tasks | What to Look For | When to Call Roov |
|---|---|---|---|
| Spring (April to May) | Ground walkthrough with binoculars; gutter cleaning; attic check 24 hours after first heavy rain | Ridge and hip gaps; sagging gutters; pipe boot collar condition; attic wet spots | Any new staining in attic; gutters pulling away; visible shingle displacement |
| Summer (June to August) | Nothing required; avoid all roof surface work in heat | Algae starting on north slope; debris accumulating in valleys | If algae is widespread or prior year cleaning accelerated its return |
| Fall (September to October) | Debris clearing from valleys at eave height; gutter cleaning; attic check | Debris buildup behind chimney base; soffit vent condition before freeze season | Debris blocking a valley; soft fascia behind gutters; any attic staining |
| After major storms | Ground-level photo documentation | Gutter dents, shingle displacement, debris on roof; missing ridge cap pieces | Any soft metal denting visible; missing shingles; ceiling stains appearing within 48 hours of storm |
Pro tip: Create a simple roof log. A folder, digital or physical, with the inspection date, photos from each ground-level check, and any work done on the roof. When you need to make a decision about repair versus replacement, or file an insurance claim, that documented history is worth more than you expect.
Real Missouri Stories of DIY Gone Wrong
Real example: A homeowner in Branson used a 3,000-PSI pressure washer to clean what they described as “heavy green algae” on the north-facing slope. The algae did come off. So did a significant portion of the granule coating. Roov’s inspection the following spring found the north slope had lost enough granule coverage that the manufacturer’s warranty provisions for granule integrity were no longer met. The homeowner had paid roughly $40 in water and time to create a situation requiring a roof replacement several years ahead of schedule.
Real example: A homeowner in Ozark tried to reseal what appeared to be a lifting section of step flashing at a dormer wall using roofing tar from a hardware store. The tar sealed the visible face of the metal but did not address the separation at the wall face above the metal. Water continued to enter at that point through two subsequent storm seasons. By the time Roov was called, the wall framing behind the flashing had developed mold in the insulation layer and the OSB sheathing on one stud bay had begun to delaminate. What would have been a targeted flashing repair became a repair that also included sheathing and insulation replacement.
Real example: A homeowner in Republic installed a decorative sign bracket on the exterior wall just above the roofline, driving two lag bolts through the fascia and one through the shingle edge. The single shingle penetration had no sealant and no flashing. During the first hard rain with a westerly wind component, water found the bolt hole and tracked along the shank into the wall cavity. The homeowner attributed the resulting stain to “condensation” for two winters before calling Roov. The deck board at the eave had softened and the first eight inches of fascia at that section had rotted through.
Real example: A homeowner in Nixa painted the entire soffit including all soffit vents during an exterior repaint project. The house had twelve soffit vent openings that were fully sealed by the new paint. The following winter, attic condensation built up on the cold north deck and produced moisture staining and eventual mold on the underside of the sheathing above the bedroom closets. The moisture problem took two years to present as visible staining. The repair required attic mold remediation, new insulation, and reopening every soffit vent. The whole sequence began with a roller and a can of exterior paint.
Real example: A homeowner in Forsyth installed gutter guards across all gutters on the home without researching the specific product’s compatibility with oak leaf debris. Over one fall season, fine shredded oak material packed into the mesh of the guard and sealed it completely. Water backed up behind the guard, overflowed behind the gutter, soaked the fascia continuously through that fall, and by spring the south-facing fascia had developed soft spots across two full elevations. The gutters had to be removed, the guards discarded, the fascia replaced and wrapped, and the gutters reinstalled before the home went on the market.
Frequently Asked Questions
Q: Is it ever okay to walk on my roof? In general, no, unless you have the appropriate footwear, training, and fall protection equipment for your pitch and surface type. For homeowners doing their own maintenance, every task that seems to require walking the roof can either be done safely from the ground with binoculars or from ladder height at the eave, or it belongs to a professional. The risk of a fall from a residential roof is serious and the information value gained by walking it yourself is almost always not worth that risk.
Q: How should I safely clean my gutters? Use a stable extension ladder at the correct 75-degree angle with a partner present to stabilize the base. Work from the ladder only at eave height, never leaning out more than one arm’s length to either side. A gutter scoop or small trowel clears debris effectively. Rinse with a garden hose to confirm drainage. If the gutters are two-story or the pitch makes ladder placement unstable, have Roov or a gutter service handle it.
Q: Can I use a pressure washer on a shingle roof? No. Pressure washing asphalt shingles damages the granule coating, which accelerates UV aging and voids most manufacturer warranties’ granule integrity provisions. The correct approach for algae is a diluted low-pressure bleach application. GAF explicitly states in their technical documentation that high-pressure sprays should not be used on shingles.
Q: What is the best way to remove leaves and debris from my roof? For debris that has accumulated in roof valleys or around chimney bases, a soft-bristle brush or a leaf blower at low setting from safe eave-height ladder access is the appropriate approach. The goal is to move debris to the gutter and then down the downspout, not to push it up the slope. Never use a high-pressure air stream directly on shingles in a way that might lift tabs or disturb flashing.
Q: What small repairs are safe for homeowners and what are not? Safe from the ground or stable ladder position at eave height: applying a diluted bleach solution to algae, clearing gutter debris, photographing areas of concern for a roofer’s review, and doing attic checks through the access hatch. Not safe without professional training: replacing shingles, resetting or replacing flashing, replacing pipe boots, adding or moving vents, and any repair that requires getting above the gutter line and standing on the roof surface.
Q: How often should I have a professional inspection if I do some maintenance myself? Every two to three years for a roof under 15 years old with no known storm history issues. Annually for a roof over 15 years old or one that has been through confirmed hail or wind events. After any storm that produced significant hail or caused visible exterior damage elsewhere on the property, schedule an inspection regardless of the roof’s age.
Q: Does walking on my roof void the warranty? Not automatically, but damage caused by improper foot traffic is typically excluded from manufacturer warranty coverage. If Roov or another inspector attributes granule loss to scuffing from foot traffic rather than a manufacturing defect or storm event, the warranty claim for that damage will generally not be covered. More practically, the physical damage to the shingles is the more immediate concern.
Q: What if I see a shingle that is clearly lifting but I cannot reach it safely? Document it with a photo from the ground, note the location on the roof, and schedule a Roov inspection promptly. A single lifted shingle does not produce an immediate catastrophic leak in most cases, but it does create a vulnerability to wind-driven rain and accelerated deterioration at that point with each subsequent storm. Addressing it before it leads to a tear-off or active leak is the right sequence.
Key Takeaways
- The fall risk is real and serious. Residential roofs are responsible for serious injuries every year among homeowners doing routine maintenance. The information you can gain by walking your own roof almost never justifies that risk.
- Pressure washing destroys granules. This is not a minor cosmetic issue. Granules are the UV and physical protection layer for the asphalt. Removing them with high-pressure water shortens roof life directly and measurably.
- Caulk hides problems rather than fixing them. A surface application of sealant that does not address the actual water entry point causes delayed discovery of structural damage behind the flashing or decking.
- The safe DIY zone is the ground. Binoculars, photos, gutter cleaning at eave height with a partner, and attic checks through the hatch are the appropriate scope for homeowner roof maintenance.
- Annual attic checks catch more than exterior walks. The attic reveals moisture patterns, duct conditions, and insulation damage that are completely invisible from the roof surface or the ground.
- A simple maintenance log protects your investment. Documented inspection dates, storm photos, and repair records are valuable for insurance claims, sale disclosures, and warranty conversations.
- When in doubt, call Roov. A free inspection that shows you exactly what your roof has, what you can safely do yourself, and what needs a professional sets you up to maintain your home intelligently without the risk of making the problems worse.
Want to Help Your Roof Without Hurting It?
Roov serves Branson and all of Taney County, along with Nixa, Springfield, Ozark, Republic, Forsyth, and communities across all eight counties of Southwest Missouri. Every free inspection includes a written Roof Condition Report with photographs explaining what we found, what it means, and what parts of your maintenance you can safely continue doing yourself. We will show you exactly where your safe line is so you can protect your home confidently without creating the problems this article describes.
Call 417-370-1259 or schedule your free inspection online.
Roov | Roofing with a Purpose | Serving Southwest Missouri